Exploring Sheets
- Ant
- Jul 30, 2022
- 5 min read
Updated: Feb 9, 2023
We’re talking about the area at the bottom of a spreadsheet where you can see names like Sheet1 and Sheet2. They go by a few names; some people call them tabs, sheets or worksheets, I'll refer to them as sheets, but whatever works for you is fine. The spreadsheet is the entire document, and a sheet is like a page within that document. So when you create a new spreadsheet, you’ll be presented with a single sheet at the bottom.
It's good practice to keep your sheets organised, don't try and cram everything onto one sheet; things will quickly get out of control. I’ve added another sheet here (Sheet2) to demonstrate multiple sheets within a spreadsheet. There are many options available to you in the popup menu of a sheet that I think is worth exploring.
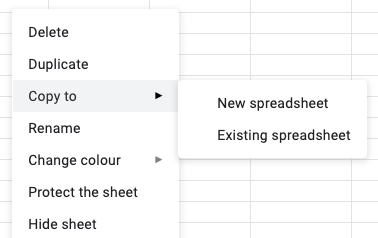
Okay, so let's look at the sheet menus. You can open this menu by clicking on the little arrow next to the name or right-clicking on the tab name.

Delete
Pretty obvious, this one, but you guessed it, choosing this will delete just the selected sheet, not the entire spreadsheet. It’s quickly done by accident, so thankfully, there is a popup warning to ensure it’s deleted.

Even if you were to ignore this warning and delete the sheet, don’t panic; Google Sheets has, what is known as Version History built-in, so you can always get it back again. We’ll cover Version History in another lesson as it’s comprehensive, and therefore, it demands another lesson in its own right.
Duplicate
Duplicate allows you to make a clone of the current sheet, including formatting and formulas. As soon as you click this, another sheet is added next to the original and will be prepended with ‘Copy of ….’

This is useful if you want to play around with the copy before committing to changing the original sheet, but also, if you would like to store a backup version of a sheet, you can duplicate it and hide it for future reference.
Copy To
This option gives you two choices. You can copy this sheet into a brand new spreadsheet that will be created for you automatically, or you can simply copy it to an existing spreadsheet.

New Spreadsheet
As mentioned earlier, copying a new spreadsheet will automatically create a brand new spreadsheet for you and present you with a link to open up that spreadsheet. For example, you can see below clicking on ‘Open spreadsheet’ will open a new tab in your browser to see the copy you just created. Of course, you’ll need to name the spreadsheet as it will be untitled, but the tab and all its contents will be there, ready and waiting.
Clicking on the green ‘OK’ button will dismiss this popup, as will clicking on the grey cross in the top right corner.

Existing Spreadsheet
There are a few more options when you copy to an existing spreadsheet. First, you’ll see this window popup where you can locate the spreadsheet you want to copy your selected sheet into.

You’re spoilt for choice here, but it’s good to be able to have the tools to find what you’re looking for.
Starting at the top, you can see you can look in your Drive, the folder named ‘Shared with me’, or you can locate any recent files you’ve been working on. I usually find the ‘Recent’ one the most useful.
Failing that, you could search for a file by typing in its name and clicking the magnifying glass button.
Below this, you will see your folders (I only have one here, but you might have more), so you can click on those to drill down to find what you are looking for. This folder is stored in my root folder (My Drive). If you have folders within folders, you will need to drill down until you find the right one.
Likewise, the file displayed underneath this folder in the image above is also saved directly into the root folder (My Drive), so you could select it from here if that’s where the file is saved.
You can paste the URL of a particular spreadsheet right at the bottom if you know it.
You’ll notice in the top right corner, there are two little icons, shown below. The first one just allows you to display your folders and files either as tiles or lines, and the second one sorts the folders and files alphabetically.

Rename
Nice and straightforward, clicking this in the menu will just highlight the text in the sheet name so you can type a more suitable name. But, of course, the easier way to do this is by just double-clicking on the name to highlight it.

Change Colour
This is a convenient tool, particularly if you have a load of tabs along the bottom of the sheet. In addition, it helps to draw your attention to a specific sheet(s).
When you click this menu option, you will see a colour picker appear, so all you need to do is choose the one you want. You can also click on the custom plus icon to type in a HEX value, like #ff0000, for example.

Once you’ve chosen your colour, your tab will look something like this:

Protect the sheet
I’m going to jump over this one for now as it’s a bit more involved and needs a dedicated lesson. Still, it’s a handy tool when you’re sharing a spreadsheet with others as it allows you to prevent unwanted changes to the entire sheet or just part of it.
Hide sheet
Sometimes it is helpful to hide sheets; for example, the bottom may be cluttered with too many sheets, and some are just not necessary to show, or you may not want other people to see a particular sheet.
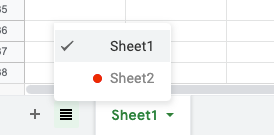
You can always unhide hidden sheets whenever you want by clicking on the little burger icon (4 horizontal lines). For example, you can see in the image below I have hidden sheet2; it’s not shown next to sheet1 anymore, but clicking on the burger reveals it in the list, and the sheet name is slightly greyed out to signify it’s hidden.

If you’ve shared your spreadsheet with others and have editing rights on the sheet, they will be able to view hidden sheets, so this is something to bear in mind if it contains sensitive information. However, if the shared spreadsheet is only ‘View only’ or ‘Comment’, then the shared users will not be able to view hidden sheets, sweet!
View Comments
Believe it or not, this ‘View Comments menu option also requires another lesson to go over all the features as it’s pretty comprehensive. To be honest, I never use this feature from this tab menu as there are other ways to view them which tend to work better, but it is there nonetheless if it floats your boat.
Move Right & Move Left
I’m not sure why Google even bothered with this; it’s a complete waste of space, in my opinion, as it’s much easier just to click and drag on a sheet name to move it to where you want it to be. I guess it could be helpful on a mobile device, but if you’re working on a desktop or laptop, don’t bother with this one.

Add a new Sheet
Lastly, I thought it was worth mentioning that you can add a new sheet by clicking on the little plus button or if you’re like me and prefer shortcut keys, then shift + F11 will do the same thing.

That’s it, folks; I hope that was helpful.


Comments